Signs the message content itself
Proves identity
Prevents message tampering
Symmetric or Asymmetric signatures
No “secret” ever hits the wire
IETF Draft: https://tools.ietf.org/html/draft-cavage-http-signatures
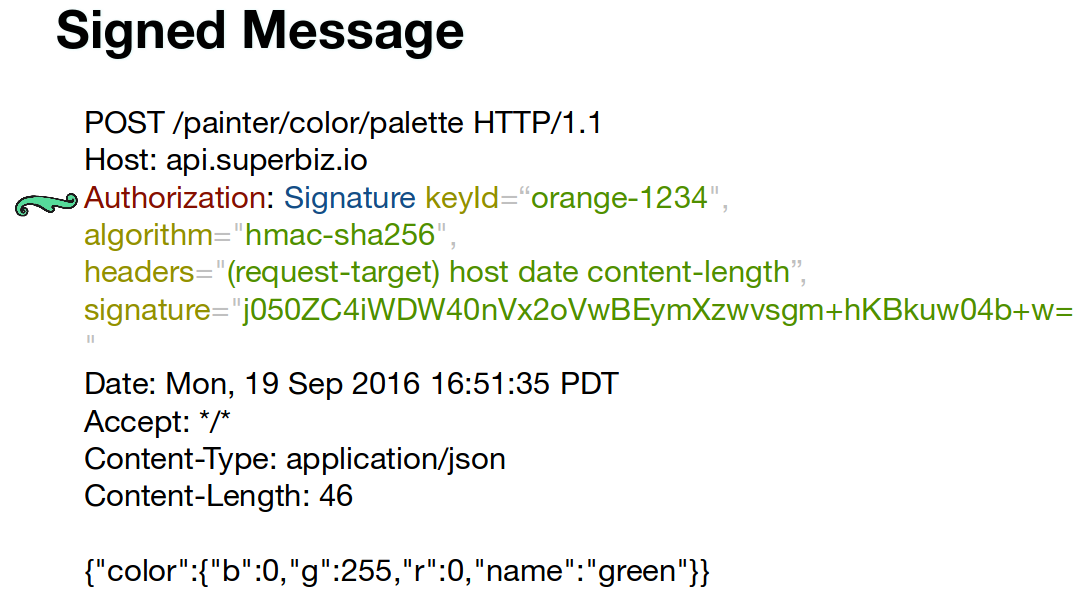
On this HTTP request example performed against the TAG, the client application in posting a new color, seen in the message payload at the bottom.
The Authentication header contains the authentication data to be used by the TAG and defines:
The prefix identifying the authentication scheme… Signatures, Bearer (for OAuth 2.0), Basic.
The list of headers that will be signed, for this case, content-length host date (request-target).
Algorithm used to create the signature. We will be concatenating the values of the mentioned headers, hashing the result with SHA-256 and signing that hash with the HMAC signing algorithm and a symmetric key secret.
The id of the key secret used to create the signature.
The signature is the value created by the signing algorithm, using the secret key, over the contents of the mentioned headers.
The TAG will receive the Authentication header, will perform the same signing operation to that HTTP message and will determine if the message was signed with a trusted key or if the message has been tampered with while in transit.
More than proving identity, this authentication scheme also asserts trust over the message’s contents.
This demo will give you basic instructions to start the demo. For additional setup details, please check que quick start demo.
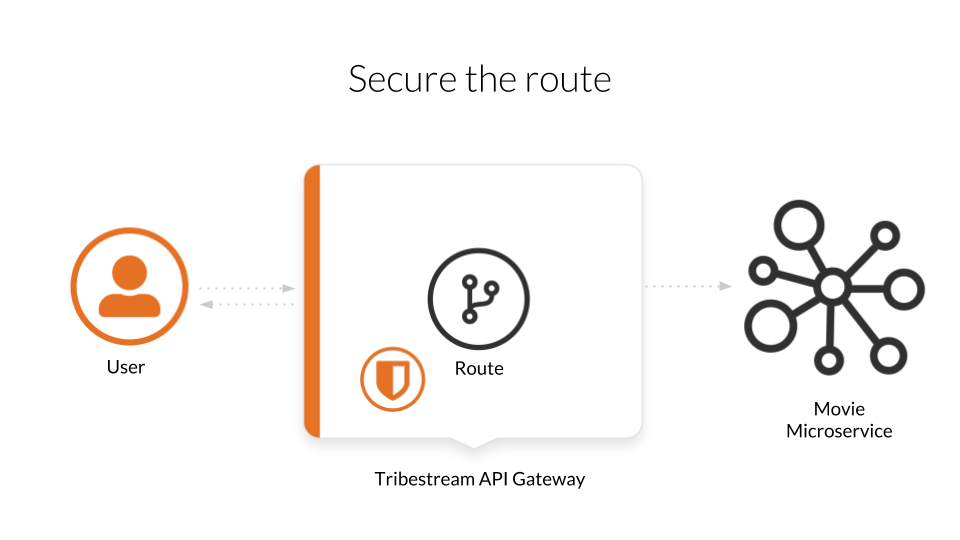
We are going to start the Movie microservice, the TAG, use a route to forward the user requests to the Movie and then secure those requests with HTTP Signatures.
In order to run our demo Microservice we need to open a terminal and execute the following command:
If we already have used the movie-api:
docker start movie-apiFor the first time:
docker run -d -p 9090:9090 --name movie-api tomitribedev/movie-apiWe can validate that our microservice is up and running by executing the following command:
curl -i http://localhost:9090/movie-api/api/moviesOn another terminal execute the following command according to your operating system:
We can reuse the TAG docker container we created from the Tribe quickstart guide. To start TAG execute the following command:
docker start tagIf this is the first time you run TAG, open a terminal execute the following command according to your operating system:
For linux:
docker run --net="host" -de LICENSE=accept --name tag -p 8080:8080 tomitribe/tribestream-api-gatewayFor OsX:
docker run -de LICENSE=accept --name tag -p 8080:8080 tomitribe/tribestream-api-gatewayTo see the TAG starting process log you can execute the following command:
docker logs -f tagOpen a browser and navigate to: http://localhost:8080/tag
Login into the TAG dashboard using the following credentials:
username:admin
password:admin

We are going to add a user account and a route to our Microservice for later. Please checkout this github project:
git clone https://github.com/tomitribe/demo-http-signatures.gitChange to the demo-http-signatures folder:
cd demo-http-signaturesAnd execute this script for Linux:
./setup_data_linux.shOr this one for OsX or Windows:
./setup_data_osx.shThe difference relates to how Docker sees the host computer network.
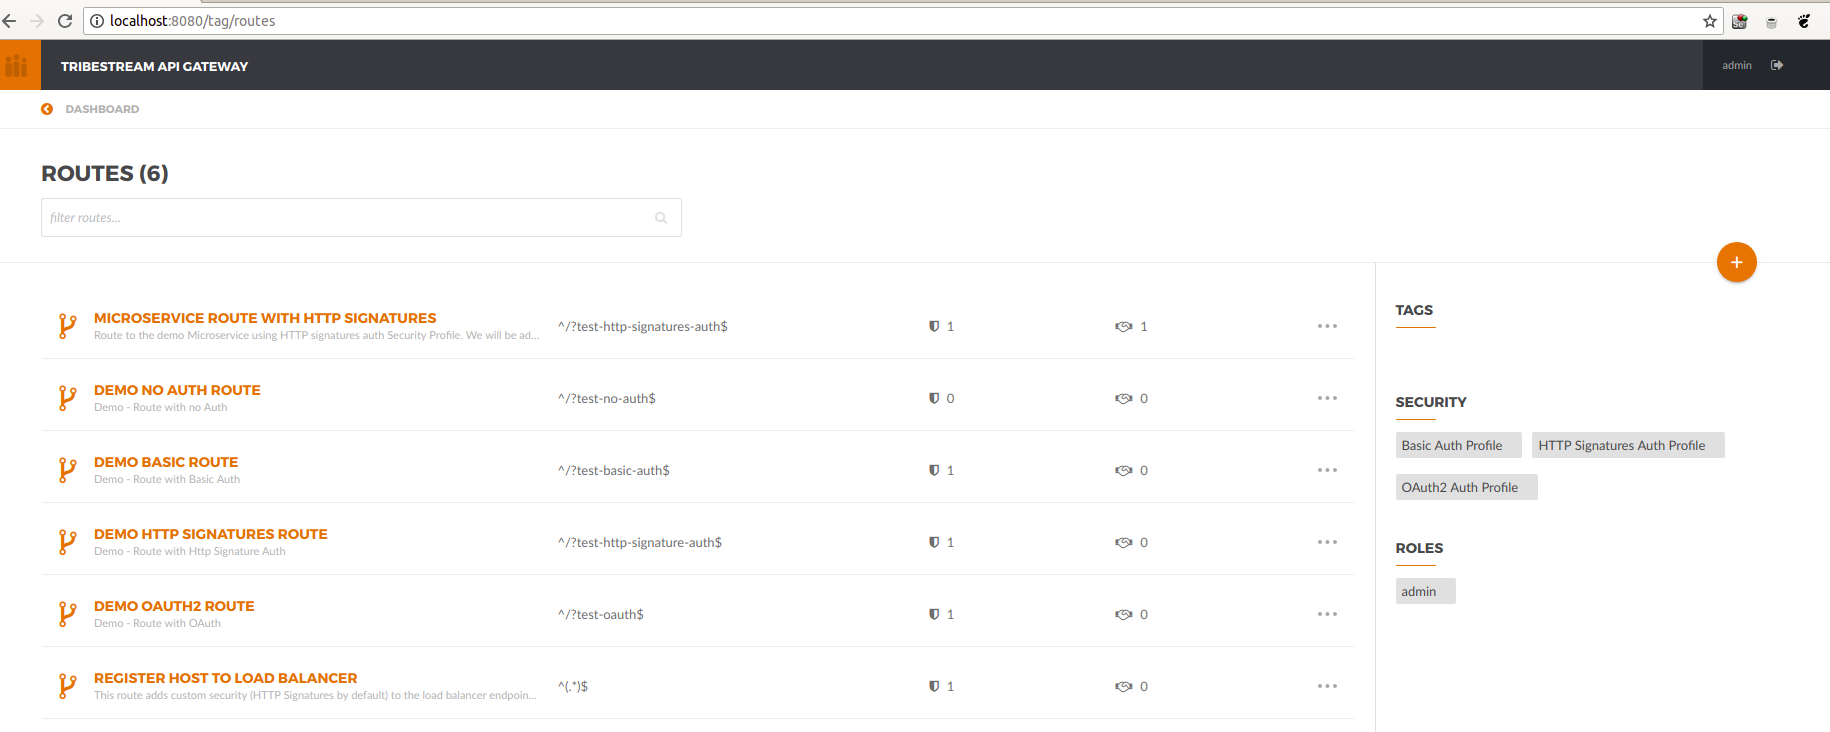
The mechanism used by the TAG to orchestrate and secure the traffic to and from API endpoints is called Routes: http://localhost:8080/tag/routes.
We can also access it through the TAG dashboard:
Access to the routes can be restricted by using Security Profiles. We are going to create a new security profile (http://localhost:8080/tag/profiles) and later return to the Routes page.
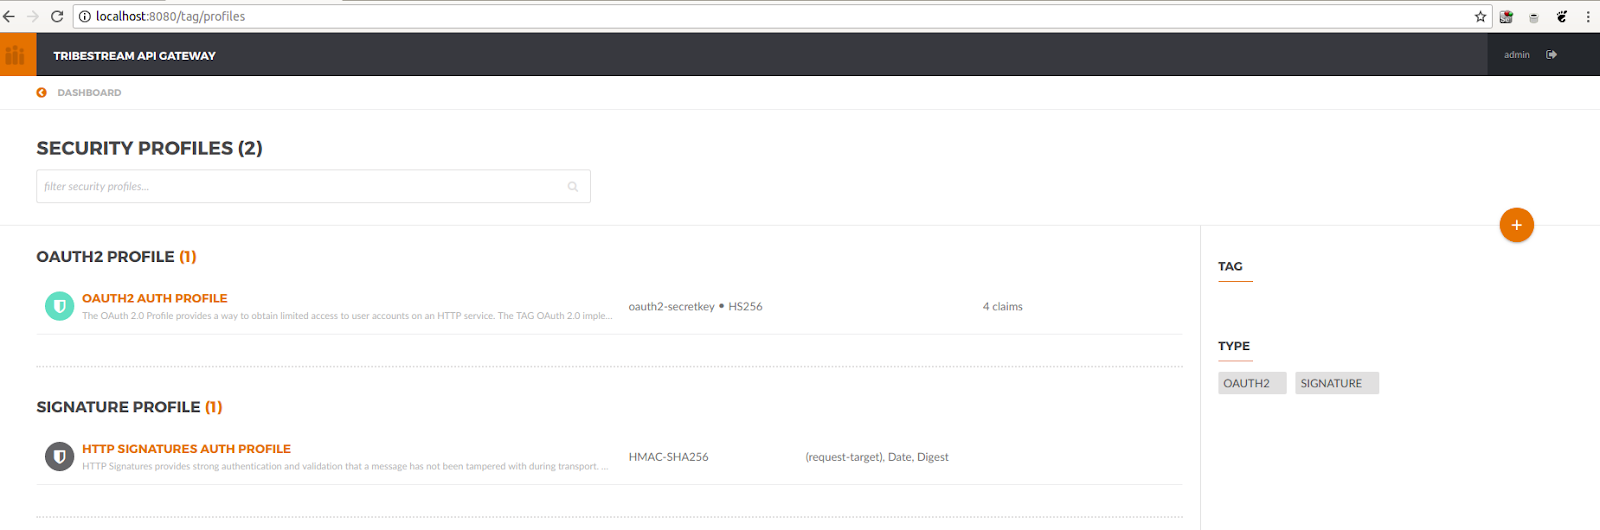
A default HTTP Signature Auth Profile is already bundled for demo purposes, we are going to use that one.
Let’s open it and see the detail page:
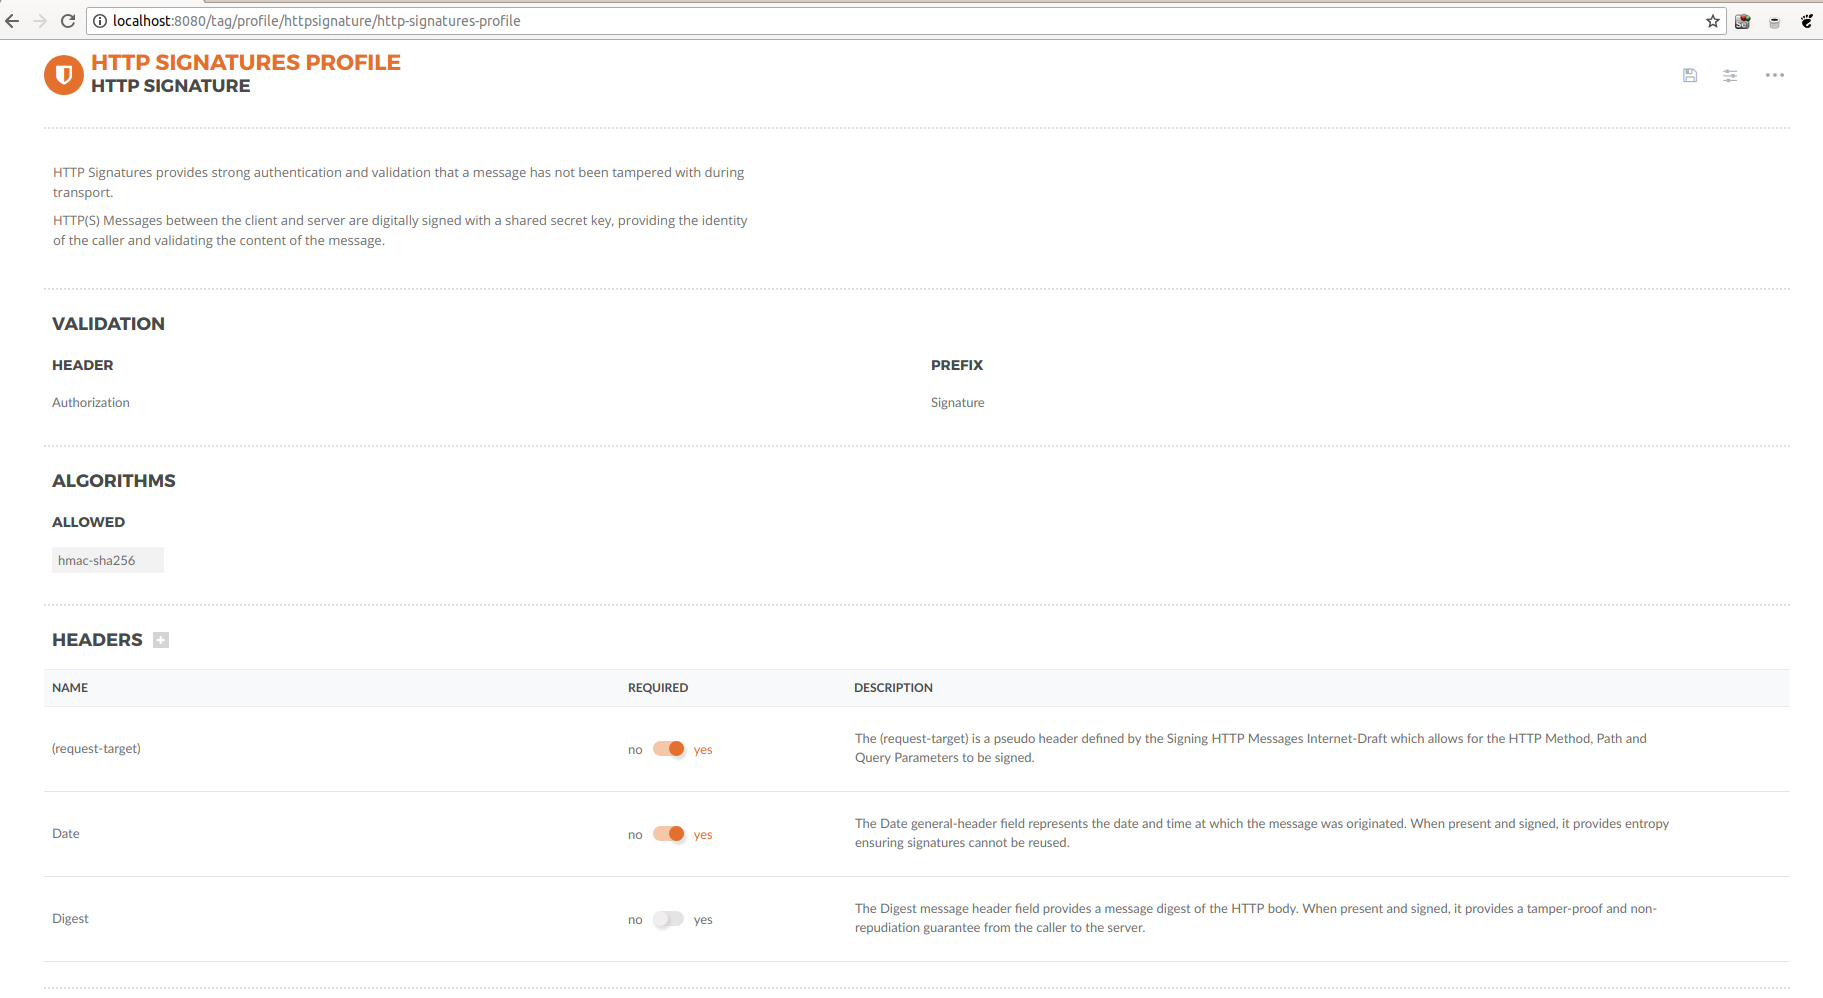
| Attribute | Description |
|---|---|
Header |
defines the authentication header name value that all HTTP requests should use |
Prefix |
defines the authentication schema string used on this security profile |
Algorithms |
Combination of signing-hashing algorithms allowed for this security profile. |
Headers |
The headers used in this authentication scheme |
All headers have a description and a toggle to make them required. When they are required, if the client doesn’t send and sign them, the request will fail. If not required, the client doesn’t have to send them, but if it uses them, they will be validated.
On that page, if you scroll further down, you will see the date and digest fields. We will describe them in later videos of this series.
Let’s go again to the routes list page: http://localhost:8080/tag/routes.
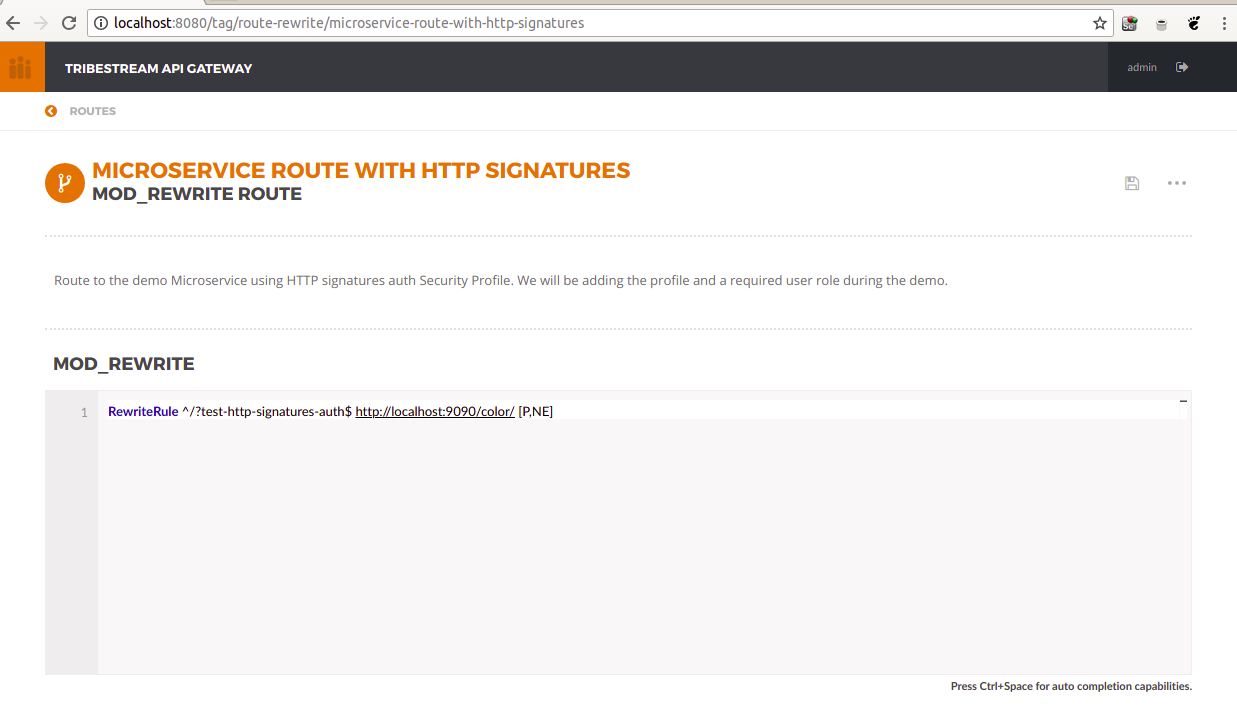
We’ve already added a route with the provisioning script, the Microservice Route with HTTP Signatures: http://localhost:8080/tag/route-rewrite/microservice-route-with-http-signatures
This is how it looks out of the box:
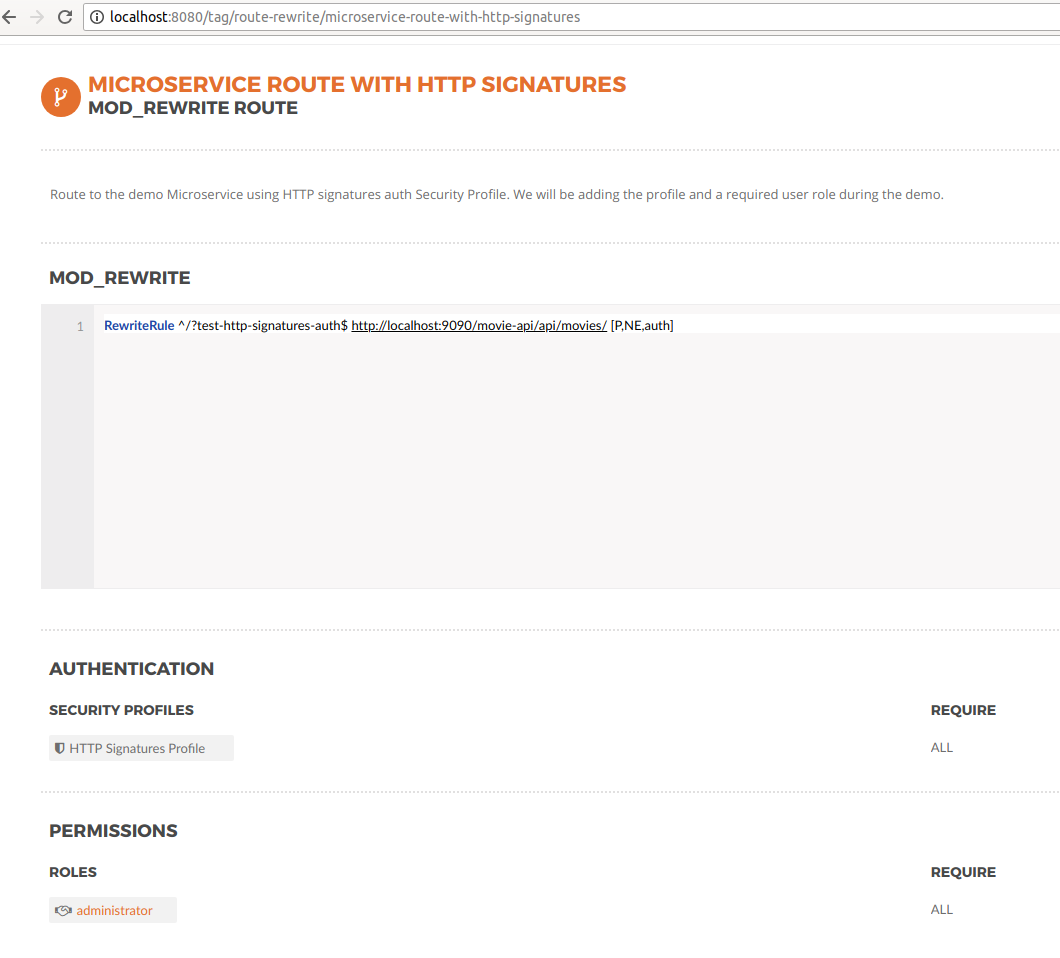
Now, we are going to add the Security profile we created and we are going to add the mandatory permission administrator, that every user must have in order to invoke the route:
Add the auth flag to the rule
Select the HTTP signatures profile from the dropdown.
Add a permissions section
Add the administrator role.
We’ll need to add a key secret to a user account. This secret will be later used to sign the requests and identify the user. We’ll use an account we added with the provioning script. From the dashboard we can access the accounts list or go direcly by clicking: http://localhost:8080/tag/account/alice
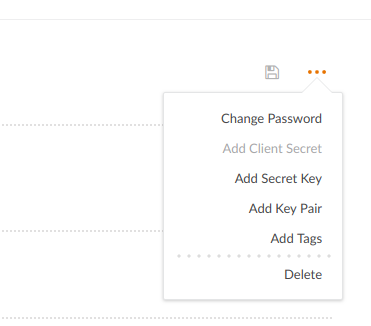
Once in the user detail page, we click on the menu and select Add Secret Key.
A modal view will pop-up with randomly generated values that we can edit. Let’s add:
custom key id: my-new-symmetric-key.
custom key value: super-secret-value
We’ll use both the Id and Value later, to perform the HTTP requests.
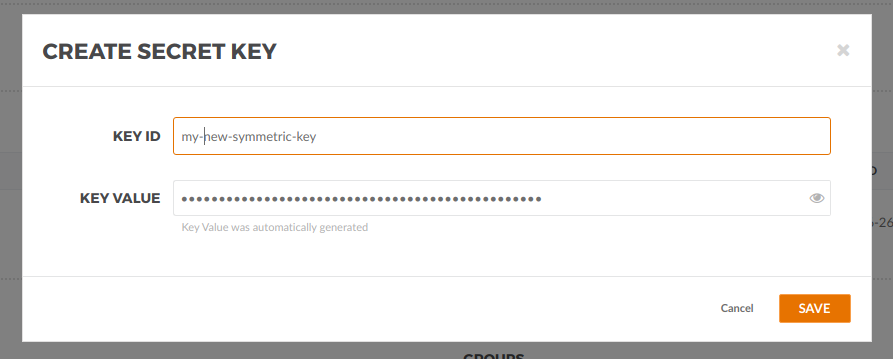
Save it!
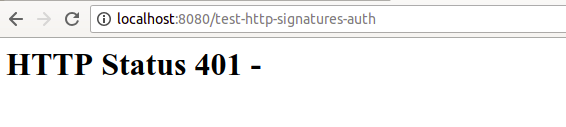
Let’s execute the route with a browser: http://localhost:8080/test-http-signatures-auth
This will get a 401 error for unauthenticated:
With a regular curl command:
curl -i http://localhost:8080/test-http-signatures-authHTTP/1.1 401 Unauthorized
X-Proxy-Do-Rewrite: 1558293
X-Request-ID: 572667cbcff87d72
Content-Type: application/json;charset=ISO-8859-1
Content-Language: en
Content-Length: 54
Date: Tue, 26 Jun 2018 16:24:01 GMT
Server: Tomitribe-TAG
{"error":"This request requires HTTP authentication."}We need to add authentication to the request. We are going to show 2 ways for doing that. The first one with a bash script, the second one with a test window inside the TAG.
We need to go to our demo-http-signatures project and use the sign.sh script in the command line. The script takes our secret key id, secret key value (the ones you saved before) and an endpoint to perform a GET request:
./sign.sh --key my-new-symmetric-key --secret "super-secret-value" -X GET http://localhost:8080/test-http-signatures-auth....
> GET /test-http-signatures-auth HTTP/1.1
> Host: localhost:8080
> User-Agent: curl/7.58.0
> Accept: */*
> Authorization:Signature keyId="my-new-symmetric-key",algorithm="hmac-sha256",headers="(request-target) date digest",signature="DldAr+hjxrnO5lTxvh8eVCPV2+yx5ohdXhznlJGhStc="
> Date:Tue, 26 Jun 2018 17:36:53 WEST
> Content-Length: 0
>
< HTTP/1.1 200 OK
< X-Proxy-Do-Rewrite: 10482753
< X-Request-ID: 22cf0e9f8f92bd0c
< X-Proxy-Received-HTTP-Status: 200
< X-Proxy-Elapsed: 27276874
< X-Powered-By: Express
< ETag: W/"5-qUFKsEwr2rIea20TZiihh+Dfqkw"
< Content-Type: text/html;charset=utf-8
< Transfer-Encoding: chunked
< Date: Tue, 26 Jun 2018 16:36:53 GMT
< Server: Tomitribe-TAG
<
* Connection #0 to host localhost left intact
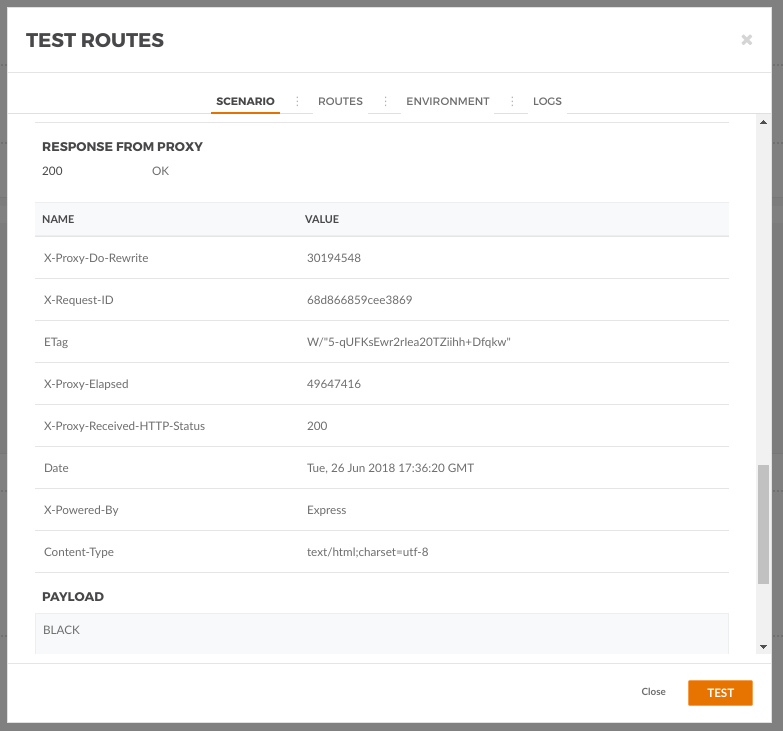
BLACKIn here you can see the sent authentication header. If you are curios on how the header is computed, I invite you to check the sign.sh script.
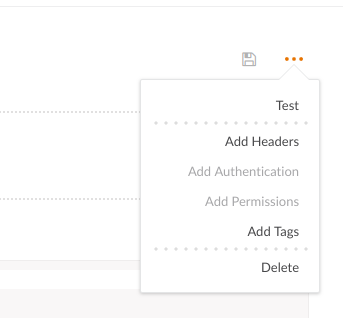
The TAG comes with a test window to perform HTTP requests. Go to the Dashboard, the to routes, open our Microservice Route and click test on the route detail menu.
Then we can give a unique name to the test, for later reuse, add the path for our endpoint and add the HTTP signatures authentication from the menu.
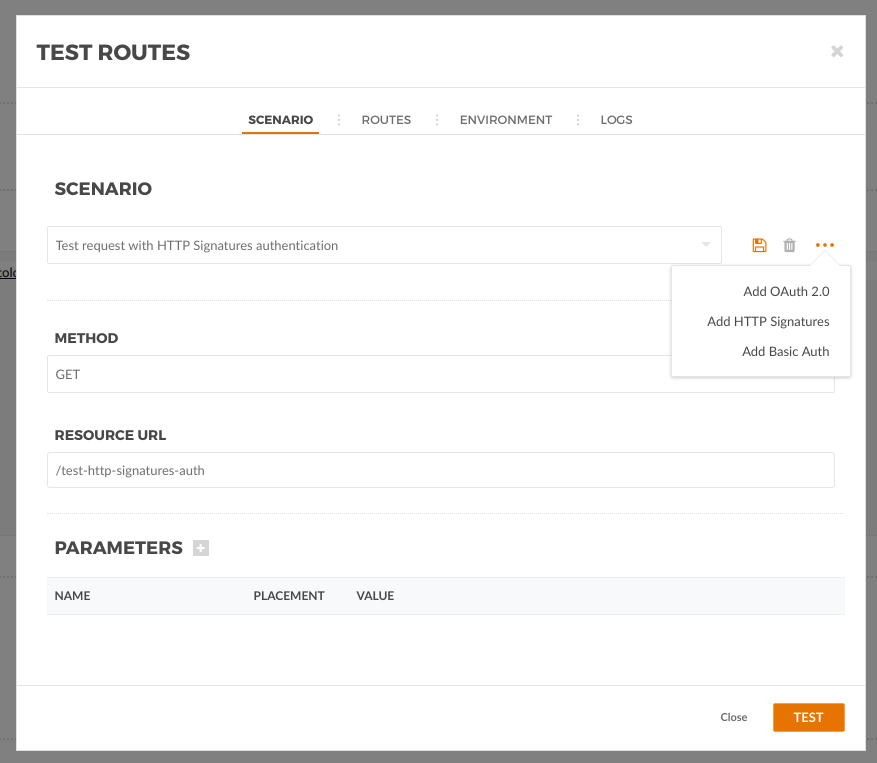
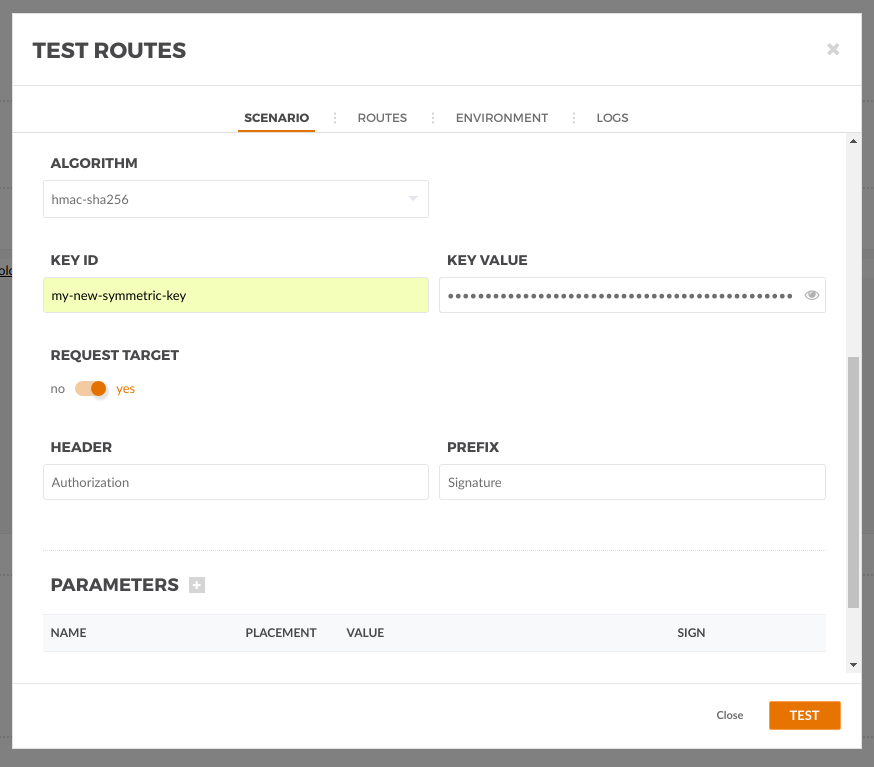
There, we need to set the secret key Id and the secret key value from our user, keep the header and prefix defaults and add the Date header as required. Set the Request Target to yes to include "GET /test-http-signatures-auth" in the signature.
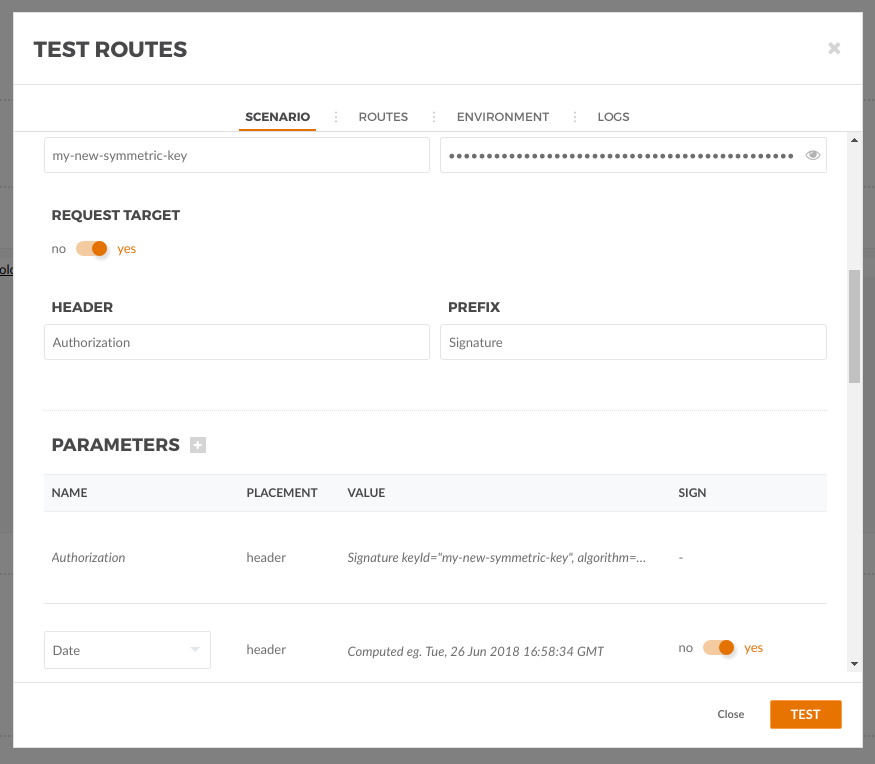
Then click the plus icon in front of Parameters to add an additional header, select Date on the dropdow and click sign on that row. This will send the date header and include it in the signature.
Click test and you should get a pretty HTTP 200 and a result payload: